

")

Controllers for staircase lighting
Installation guide
- Put the copper cables (typically 0.5 mm twisted-pair) between the points of light (LED eyes, LED strips), and the place, where the staircase driver will be (cabinet, box, bay, basement, attic, safe, utility room, etc.)
- Put the 3-core cables (can be thin, because they lead only the signal) between the hole - place of the bottom detector and the controller, and between the hole - place of the top detector and the controller.
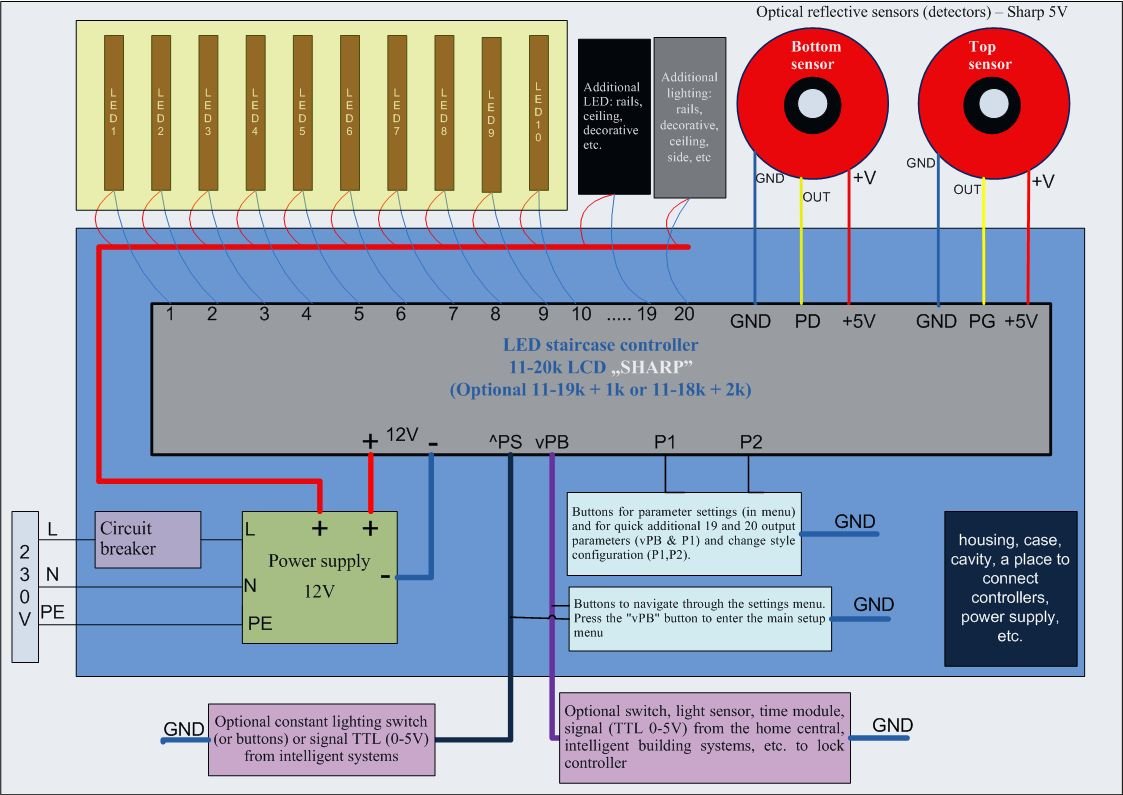
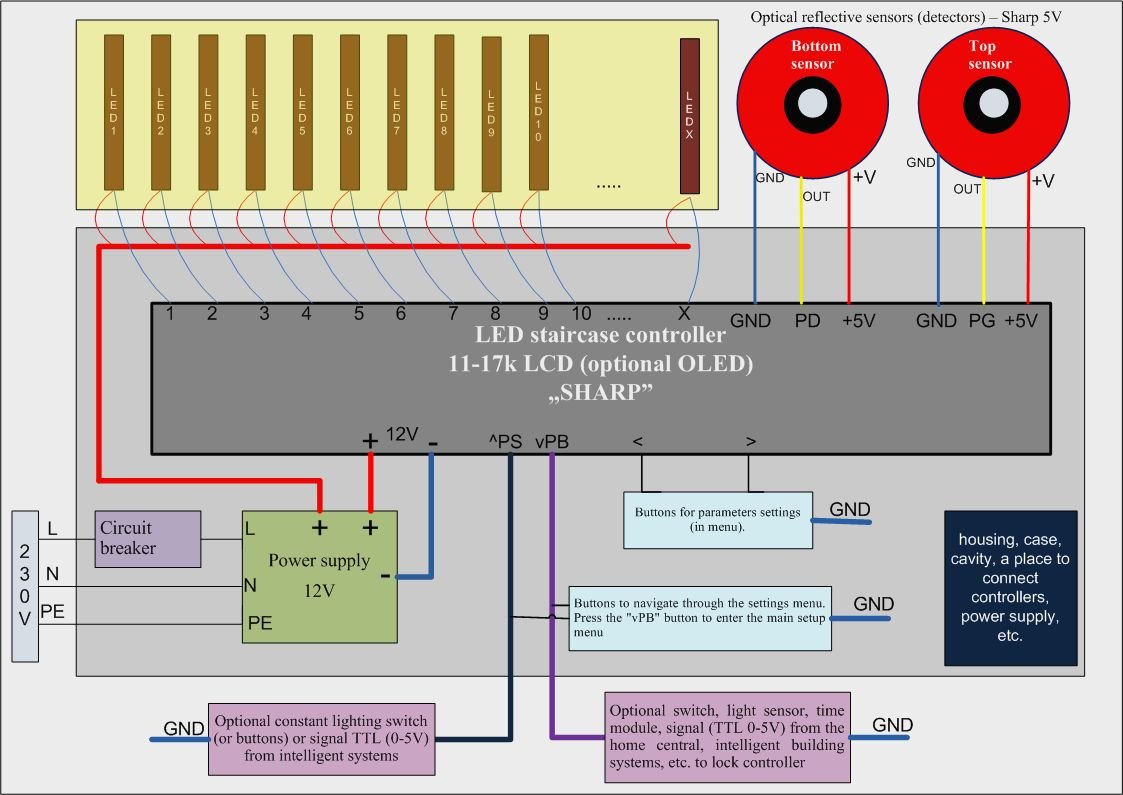
- Optionally: put the wires (minimum 2 cores, 0.5mm to1 mm) to illuminate the handrails, railings, ceiling lighting, top, side or decorative lighting.
- Put extra cables (from switches operating a permanent lighting, buttons operating locks, etc.) For example, the output of the constant light function can be connected in parallel to several buttons located in different places.
- Lay cables 230V (or 110V in US) (3 wires L, N and PE) to the cabinet, bay, box, etc., to connect the switching power supply of 12V.
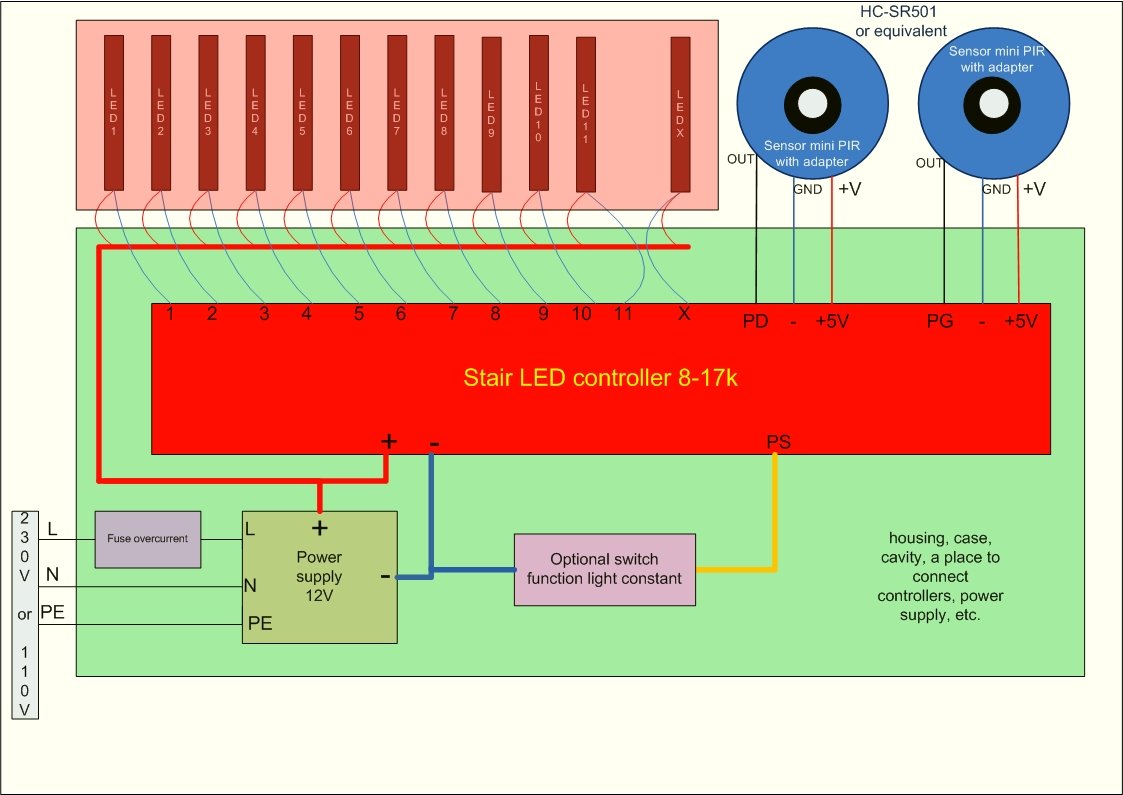
- Connect LED spots or strips to the wires (preferably soldered or screwed to the terminals). Not recommended to use "click connectors/ terminals".
- Verify that there are no cords short-circuited on LED strips or spots (meter this (ohmmeter) and / or connect each point of light to 12V and check if it lights). If there is a short circuit, it should be located and removed. If the controller connects to the tape on the cable with a short-circuit that may causes damage to the driver channel transistor.
- Connect the staircase controller to the 12V power supply (if possible, check the voltage on the power supply. It should be not higher than 12V). In the modular switching power supplies, you can adjust the output voltage of the power supply. If the LED on the controller lights (eg, yellow, red), you can go to the next step.
- Connect the conductors from stair treads lighting(optional from the railing top or ceiling lighting, etc.) to the staircase controller.
- Check the operation of the controller using attached buttons. First, you can check the operation of the PS. Then, by simulating the operation of the detector on the micro buttons - PD and PG. If the staircase simulation will be carried out successfully, you can proceed to the next step. Micro-switches can be left connected to the connectors.
- Select the algorithm, effect and initially adjust the speed, performance, etc.
- Connect the PIR motion detectors or infrared barriers to the PD and PG enter (and power) according to the descriptions of the detector. Check the action on the detectors. Depending on your needs, adjust the angle of them (using Fresnel Lens or sleeve) and sensitivity (using potentiometer, switch or luting of PIR element).
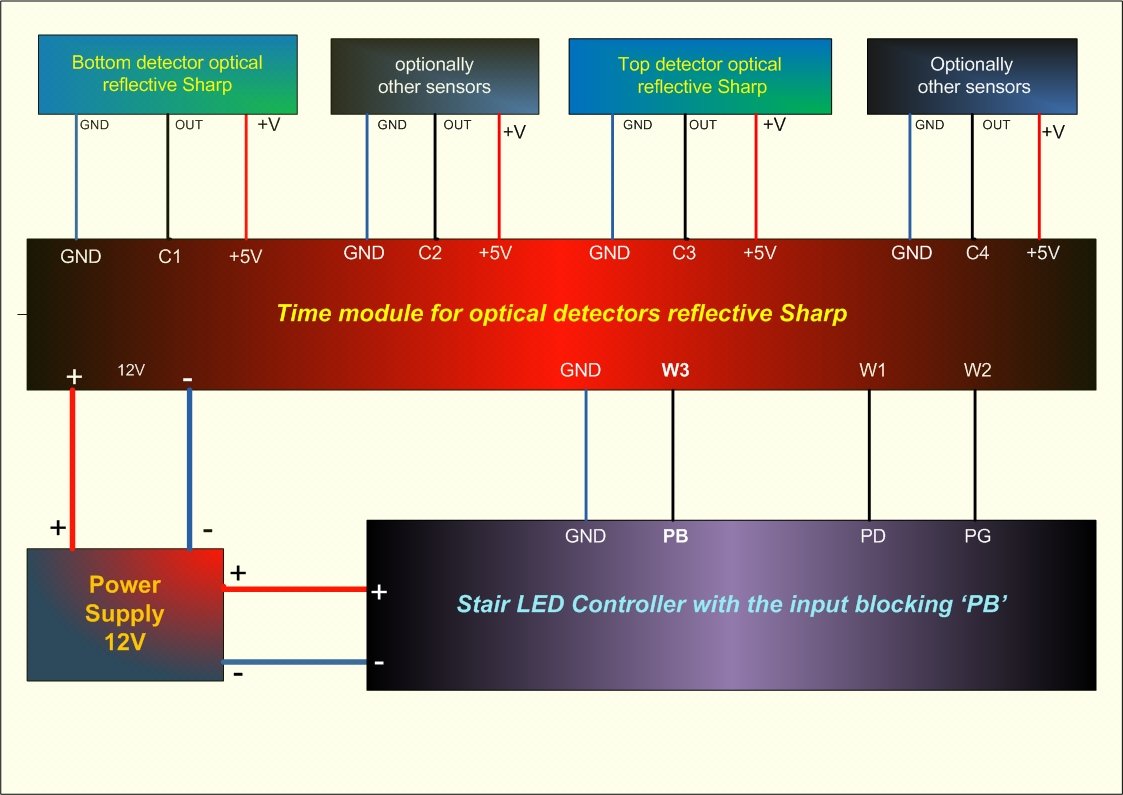
- If you use the "Time module for detectors" connect the detectors to the module (and the power to the timer) and timer module to the controller (W1 to the PD and W2 to the PG). In case of using "Time module for controller" the outputs should be connected W1 to the PS and / or W2 to the PB.
- Tune in to the needs, adjust the times, speed, select the effect, algorithm, etc. for typical conditions prevailing on the stairs and expectations for action.


Gwarancja
Dowodem zakupu jest faktura.
Na sterowniki udzielana jest pełna dwuletnia gwarancja.
Gwarancja zwrotu 14 dni
Masz również gwarancję zwrotu produktu w ciągu 14 dni od otrzymania przesyłki. Standardowo zwracany przedmiot nie może nosić śladów użytkowania. Jednak zakupiony u nas sterownik można podłączać i sprawdzać jego działanie. Kup, podłącz, sprawdź! Jeżeli nie spełni Twoich oczekiwań - odeślij go w ciągu 14 dni, a my zwrócimy Ci kwotę za sterownik.
Gwarancja "uruchomienia"
Dodatkowo, tylko u nas, na oferowane sterowniki masz miesięczną gwarancję na wypadek przypadkowego uszkodzenia sterownika podczas montażu (uruchamiania itp.). W ciągu miesiąca od otrzymania przesyłki, jeżeli przypadkowo (w jakikolwiek sposób z winy użytkownika) sterownik zostanie uszkodzony, naprawimy go lub wymienimy na nowy. Poniesiesz tylko koszt odesłania uszkodzonego sterownika (wysokość w zależności od rodzaju przesyłki i operatora) oraz opłatę ponownej wysyłki naprawionego/ nowego urządzenia (12,30 zł listem poleconym).
Guarantee
2 years guarantee!
Returning
You have the right to withdraw from your online purchase or mail order within 14 days. You will have to pay the costs of returning the goods to us. Please note that normally you may not use goods that you have received before deciding to withdraw from the purchase. Our controllers you can plug in and test!